Learn how to create an outline and switch into writing mode
Welcome to How To Write A Blog (Part Two): Becoming A Content Wizard.
In Part One, you clarified your ideas, defined your purpose, and gathered the knowledge and insights that make your blog worth reading.
That prep work is everything—it sets the foundation for what you do next.
It’s time to move from research mode to writing mode.
Learn how to create an outline that makes the writing easier, not harder—and how to give yourself the time, space, and confidence to write your blog.
Get ready to have some fun. There’s nothing better than seeing your ideas come to life on the screen.
You are entering Content Wizard mode.
This is a three-part series on How To Write A Blog. I recommend you read these in order:
- Start Here – How To Write A Blog (Part One): Get Clear On What You’re Writing
Learn how to find your blog idea, define your purpose, and do smart research. - Get Comfy – How To Write A Blog (Part Two): Becoming A Content Wizard
Learn a stress-free process for outlining, writing, and editing your blog. - Finish Strong – How To Write A Blog (Part Three): Share Your Great Ideas And Content
Learn the keys to repurposing and distributing your blog so the right people read it.
4. An Outline – The Fourth Step In How To Write A Blog
Never ever write blind. You need an outline. Trust me, I’ve learned this the hard way.
This is what happens to me, a writer with 20 years of experience, when I try to write without an outline…
“I know the content. I know what I want to say. I don’t need an outline. I’ll just start writing…”
Four hours later and I’m drowning in a jumble of words that aren’t coming together. I end up walking away from the draft. Opening a new Google Doc, and creating an outline. Now the writing flows.
Your outline is your writing guide and plan. It tells you what you’re going to write next and helps you get through the sticky bits when the words won’t come.
The caveat with every outline is this: the outline is a guide–it’s not a recipe that you must strictly follow.
It’s very likely as you’re writing you’ll move sections around, combine sections, and even drop some. I do this all the time.
Your outline ensures you never, ever start with a blank page.
To write an outline, do this:
- Open your blogidea_<topic, theme, keyword>_research_<todaysdate>_<yourinitials>.
- Read through your research and your notes from your SME call or the completed blog brief template.
Remember your blog purpose statement–this informs the structure, messaging, and content of your blog. - In your file, type Introduction.
Write a few notes about how you want to start the blog. This doesn’t need to be fully formed paragraphs. You just want to get some ideas down.
This is where you agitate on the problem and purpose of your blog. Tell people you know there’s a challenge, problem, need, etc. and that you have a unique perspective and knowledge on how to solve this.
Use emotion, storytelling, and even controversial statements to keep your readers interested and to establish your authority on the topic.
Copy any research notes and links that relate to the introduction here. Now when you start writing, you have everything you need. - In your file, type Blah Blah Section 1 Heading Title.
It’s easiest to update your placeholder headings when you sit down to write. You’re in the flow and know what you’re going to say and the best way to title each section.
Hint: format these headings as H2s and if you have keywords, incorporate them naturally in your section headings.
This first section needs to build on your introduction. It’s where you prove to people that you know what you’re writing about. Continue to agitate on the problem you highlighted in the introduction.
Make sure you give people some support, ideas, and leadership here. Depending on your blog topic, audience, and purpose, this section cuts straight to the meat of your blog giving people helpful and actionable information.
Copy and paste the research notes and links you’ll use to help you write this section here. - Continue creating sections for your blog, using placeholder headings.
One strategy with your placeholder headings is to update them after you’ve made your rough notes about the content for each section.
For example, for my menopause blog, I know I want a section titled The xxx Benefits of Estrogen for Menopausal Women. I use xxx because I don’t know how many benefits I’m going to include here so I’ll just fill this in at the end.
Remember to copy and paste your research notes and links in each section.
Every blog needs a conclusion and a call to action.
Your blog conclusion is where you sum up what you’ve shared, restate your key points, make bold statements, and reinforce your unique perspective.
Often people will skim your blog and skip straight to the conclusion, so make sure it’s focused, clear, and actionable.
People want direction. They like to be told what to do. This is what your conclusion and call to action (CTA) are for. Don’t be shy. Be bold. Be memorable.
The great thing about this approach is you can research, plan, and outline blogs in bulk and then when you’re ready to write, all the ground work is done for you.
This takes the stress and fear out of writing. You open your file and everything is there. Your blog purpose statement, research, links, and an outline. You’re ready to write.
5. Time To Relax and Write – The Fifth Step In How To Write A Blog
The key to blog writing success is giving yourself the time and space to write. You are not a content machine. You cannot write under pressure.
Schedule your blog writing time in your calendar. I like to give myself an entire day to write a blog. Yes, a full day.
Blog writing is a creative act. Pressure and creativity typically don’t fit together. Your brain needs to be clear, confident, and ready.
- Open a new Google Doc, Word file, or Notes file.
- Save or title this blank file as blogtitle_<todaysdate>_<yourinitials>.
- Open your blogidea_<topic, theme, keyword>_research_<todaysdate>_<yourinitials> file for the blog you’re writing.
- Read your outline and your research notes.
- Lean back in your chair and let your mind open up. Get up and walk around.
Make yourself a coffee or tea.
Put on your headphones and cue up your favourite music. I find it’s easier to write with music in my ears than a podcast–the music becomes white noise and doesn’t require any concentration.
You do whatever works best for you. - In your blogtitle_<todaysdate>_<yourinitials> file, start typing. Start with your introduction and keep going.
You may have moments of doubt. This is okay and normal. Return to your research. Reread your blog purpose statement. You know what you’re doing. Trust yourself.
Keep typing. Keep going. Set small goals: I’ll stay in this chair until I finish the second section, then I’ll walk around the block.
Having small tangible goals and rewards helps you break the writing process down into doable chunks of work.
You did it. Well done. I knew you could do it. Congratulations on writing your blog. Feels good eh?
Close your laptop and walk away from your desk. You’re done for the day.
How To Edit Your Blog
Every blog needs an edit. No one writes perfectly. Do not skip the editing process.
Everyone has a different style for the writing and editing process.
Sometimes I write the entire blog, leave it for a day, and then reread and edit it. Other times I review each section and make edits immediately and then do a larger full blog edit at the end.
There are no rules for this. Do what works for you.
To edit your blog:
- Start with reading your content out loud–like you’re giving a speech. This helps you catch dropped or misused words.
When we read silently, our brains auto-correct for us so we miss small grammar and sentence structure errors. - Read your blog from the bottom up.
Reading your content in reverse forces your brain to really focus on the content and the words. You’ll catch issues with sentence flow, messaging inconsistencies, etc.
After editing the blog yourself, you may want to use ChatGPT to help you with the editing process.
An AI tool and a well-written prompt can help you find awkward sentences, dropped or incorrect words, and improve readability.
You can ask the tool to check your blog against your brand style guide to ensure you’re following internal guidance on tone, language, product and service branding, jargon, etc.
Hint: use caution when asking an AI tool to edit your content. Often these tools flatten your voice and suggest generic language.
You do not need to accept every recommendation the AI tool gives you.
You are the writer. You’re in charge.
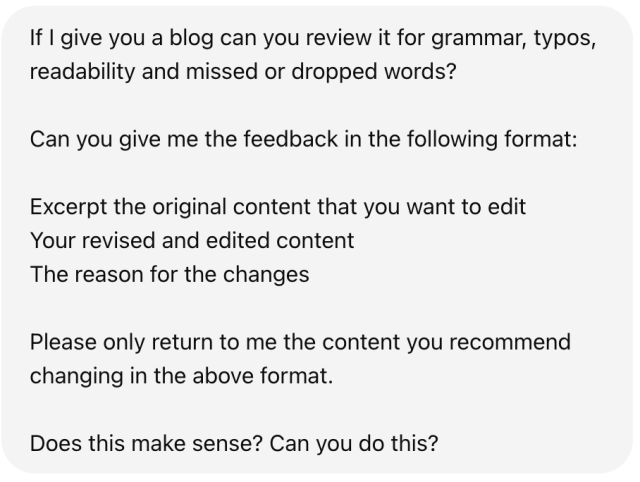
Here is the ChatGPT prompt I use for editing. You may want to give the ChatGPT or whatever tool you’re using more guidance – it’s up to you.
TL;DR Part Two of How To Write A Blog: You Are A Content Wizard
It’s time to enter Content Wizard mode.
These two steps move you from idea to words on the screen:
- Write Your Blog Outline
Never write blind. Always create an outline.
Start with an intro, placeholder section headings, and rough notes.
Organize your research under each section.
Use your blog purpose to guide the blog structure and messaging. - Sit Back, Relax, And Write Your Blog
Blog writing is creative work.
Give yourself a full day, take breaks, and set small, manageable goals to stay on track. Use music, movement, or whatever helps you focus.
Trust yourself—you’ve done the work, and now it’s time to write.
Give yourself a huge pat on the back. You’re in the Content Wizard club now. Welcome.
Feels good, right?
But you’re not done yet.
In How To Write A Blog (Part Three): Sharing Your Great Ideas And Content, I show you how to repurpose your content across platforms and how to build a simple distribution plan that gets your blog working for you.
Because one blog isn’t just one blog—it’s the foundation for all kinds of content magic.
Welcome to Content Strategy Wizard mode.
I’m here to talk about your words, your website, and how I can help your clients find and trust you.
To hire me to write for you–send me an email. I’m always happy to help you out.
